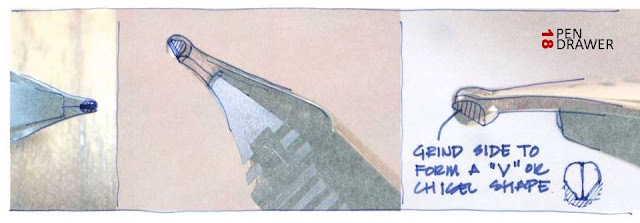
 The Architect grind (also called Hebrew or Arabic grind) is a unique nib shape that creates thin vertical strokes and thick horizontals.
The nib performance is the reverse of what you would expect from an italic or
stub. I personally enjoy this nib style and find it ideal for sketching due to the variations of line that can be produced with a single pen. The downside is that this nib style is not a common grind and to get one, you will have to either send your pen
to a nib meister or grind it yourself. If you are planning to grind your own I
recommend starting with relatively inexpensive pens or nib units first. I have
done this numerous times and found the practice beneficial. I am by no means an expert but here's what I have been doing.
The things you need:
Magnifying loupe
(15x min)
Micro-mesh Sanding
pads 3200, 6000, 8000, 12000
Micro-mesh sheets
8000, 12000
Mylar paper 12000
(optional)
Wet/dry Sandpaper
600 grit
The first thing to
consider is the nib tipping; if there is no iridium tipping then this grind is
impossible. The size of tipping is also important and effect the overall width
of the thicker horizontal lines, in my opinion I see no reason to grind a nib
smaller than a medium.
I start by checking
the alignment of the nib using the loupe, you want to see a symmetry of the
tipping before you start removing material and shaping the nib.
Using the 600 grit wet/dry
sandpaper on a flat surface, I start by holding the pen in a comfortable writing
position and do some horizontal strokes on the sandpaper. This will help you determine the angle at which to grind at, check the nib frequently with the
loupe as the idea is to eventually create a symmetrical flat area on tipping at
the angle that suits your hand. Keep in mind that the vertical distance on the
flat area will be the eventual width of the thicker horizontal line and use the 600 grit paper to bring it to the size you desire. This surface will be
relatively rough for a nib. I use the micro-mesh paper (not pads) staring at
the lowest to the 8000 on a flat surface and clean that flat area up. I cannot stress enough to check the progress with the loupe, it will save you a lot of nibs.
This next step is a
little tricky but becomes easier with practice. Using the wet / dry 600 grit
paper grind the sides of the nib to form a 'V'
shape that uses the slit in the nib as a guide. I don't grind the two sides
to form a point, I leave some of the flat portion remaining. What you are
looking for is a flat grind on each side that forms an edge parallel to the
slit of the nib. Use the loupe frequently during this grind as it is difficult
to keep the nib at the proper angle while sanding. After the material has been
removed. I use the micro-mesh pads this time to clean up the side grinds
starting with the lowest grit and working up to the 12000. The pads work
well during this stage because the give in the material helps to round over
sharp edges.
To finish up, I clean
out the slit using edge of one of the micro-mesh sheets (8000 or 12000) and
sliding it between the tines removing any tipping debris that remains. The last
step is to smooth out the nib using a sheet of 12000 micro-mesh and Mylar paper
(optional) on a flat surface. There are many different approaches to nib
smoothing that you can use, so find one that works for you.


No comments:
Post a Comment